Home

Setting up log shipping using Enterprise Manager

Prev Page Next Page
Introduction
Recovery models
Main backup types
Backing up the database files by copying
The transaction log
Transaction log restore sequence
Log sequence numbers
Truncating and shrinking the transaction log
Backing up the tail
Inside the transaction log
So, what's in a backup file?
Test: A full backup does not contain deleted data
Verifying backup files
Verifying backup files on a budget
Cumulative backups
Recovering individual tables
Backup and restore history details
Backup reads and writes
Speeding up backups
Backup speed details
Speeding up restores
Restore state affects speed too
Backup and restore rights
Log shipping
Log shipping in SQL Server 2000
Setting up log shipping using Enterprise Manager
Checking the set up
Failover
Log shipping in SQL Server 2005
Setting up log shipping using Management Studio
Checking the set up
Log shipping status report
Failover
Log shipping in SQL Backup
Using the CopyTool utility
Failover
3rd party backup applications
VDI
VDI versions
VDI errors
SQL Backup - beyond compression
Restoring a chain of transaction log backups
Restoring to the latest possible state
Backing up multiple databases
Backup retention
Making a copy of the backup file
Backup file naming conventions
Restoring the latest backup set
Network resilience
Encryption
Integrated database verification
Database file relocation
Improved backup retention
RESTORE HELP
Common SQL Backup issues
Installation checklist
Setting up rights
Configuring service rights
Backup data
Hanging issues
Common backup and restore errors


SQL Server 2000 SP4 was used to set up log shipping in this example.

 
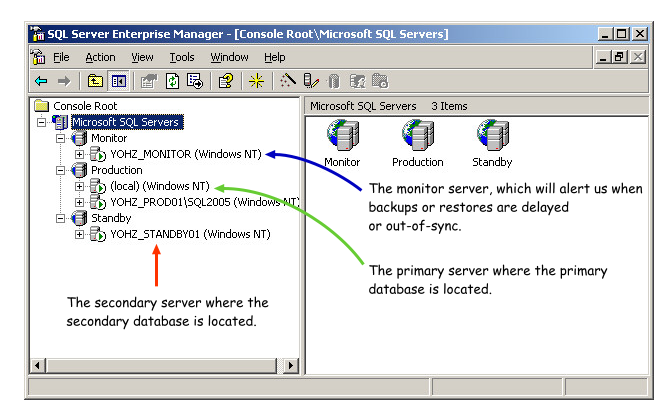
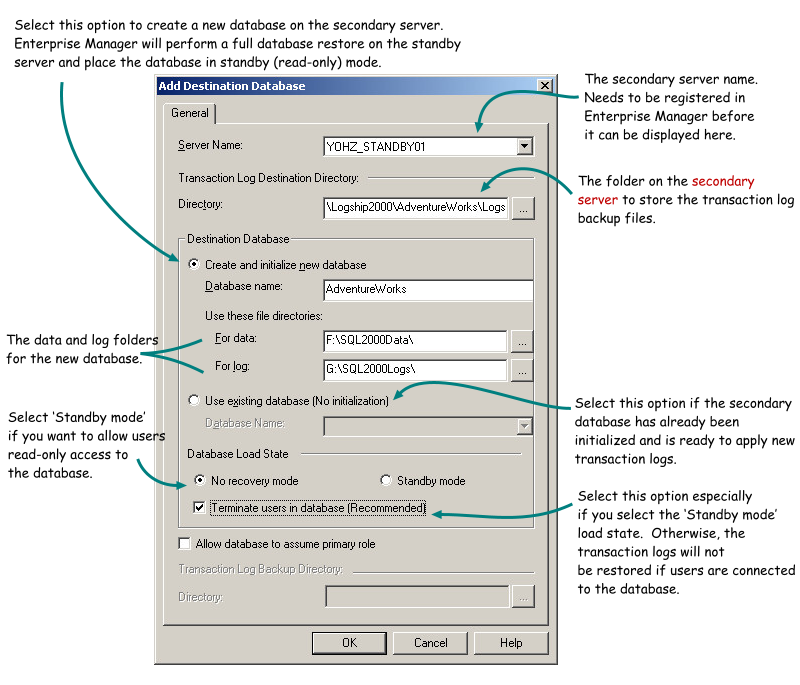
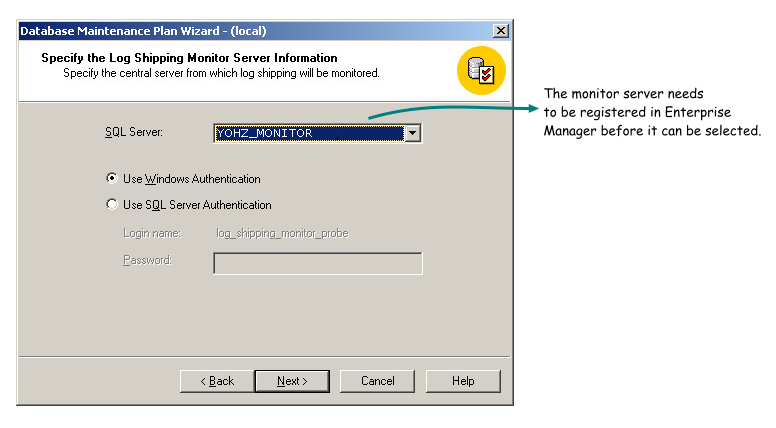
  NOTE: Before setting up log shipping, you need to first register the primary, secondary and monitor servers in Enterprise Manager. The secondary server may also be used as the monitor server, but you should use a different server if possible so that you are alerted when the secondary server fails.  
 

   Step 1 - registering the necessary servers   
ls2000_01_a
   Step 2 - starting the maintenance plan wizard   
ls2000_02_a
   Step 3 - the maintenance plan wizard welcome screen   
ls2000_03_a
   Step 4 - selecting the database to log ship   
ls2000_04_a
   Step 5 - selecting backup options   
ls2000_05_a
   Step 6 - entering the network share name   
ls2000_06_a
   Step 7 - adding destination servers   
ls2000_07_a
   Step 8 - log shipping destination details   
ls2000_08_a

   Step 9 - confirming the log shipping destination   
ls2000_09_a

   Step 10 - initializing the destination databases   
ls2000_10_a
   Step 11 - log shipping schedules   
ls2000_11_a
   Step 12 - log shipping alert thresholds   
ls2000_12_a
   Step 13 - setting up the monitor server   
ls2000_13_a
   Step 14 - Maintenance Plan summary   
ls2000_14_a

   Step 15 - Enterprise Manager task list   
ls2000_15_a
   Step 16 - SUCCESS!   
ls2000_16_a

Discuss or comment on this article on our Facebook group.

Tell your friends on Facebook about this article. Tweet about this article. E-mail your friends about this article.


Discuss or comment on this article on our Facebook group.

Tell your friends on Facebook about this article. Tweet about this article. E-mail your friends about this article.

Document history
6/27/2008    Initial release.    

 
Copyright 2008 Yohz Ventures Sdn Bhd. All rights reserved.
All product and company names are trademarks or registered trademarks of their respective owners.